Essential jazz drumming independence exercises! (3 drum lessons) | PDF download
Independence on the drum set, or the commonly used term limb independence, describes the coordination ability necessary for multitasking behind the drum kit. Pretty much all drummers use their four limbs whenever they play the drums. This ability allows them to move freely around the drum kit and respond to various factors within the music they are playing. The following essential jazz drumming independence exercises start from a basic or fundamental swing groove. From there, they focus on one particular limb to train limb independence.
All following drum lessons consist of two different notations. The first notation is the classical drum notation. The second notation represents the accompanying permutational visualisation. Only the first four exercises are written in classical drum notation and give a basic introduction to the 64 different permutational options. I opt for learning these drum independence exercises by the permutations to make you play independently from the classical notation. Moreover, it is easier to visualise all possible combinations through these permutation tables than in the classical notation. This is especially true when the exercises start getting more complex.
How to practise these exercises?
For the best long-term results, I suggest practising with a metronome or playing with the accompanying play-along track. I did not give any metronome marks as it doesn’t matter much how slow or fast you play these exercises. It is more critical that every pattern feels comfortable while playing it. Only when the movement feels right we can work on improving the speed. The tempo of the play-along track is 100 bpm. However, the pace is adjustable to your needs in most audio players. I suggest playing every practice at least four times before moving on to the next exercise. Correctly playing an exercise four times a row is a good sign that the activity is well understood.
The downloadable play-along and example mp3 tracks for these essential jazz drumming exercises have the following structure.
- One bar as a countdown.
- All practices played four times.
1. Snare drum independence – Jazz drumming.
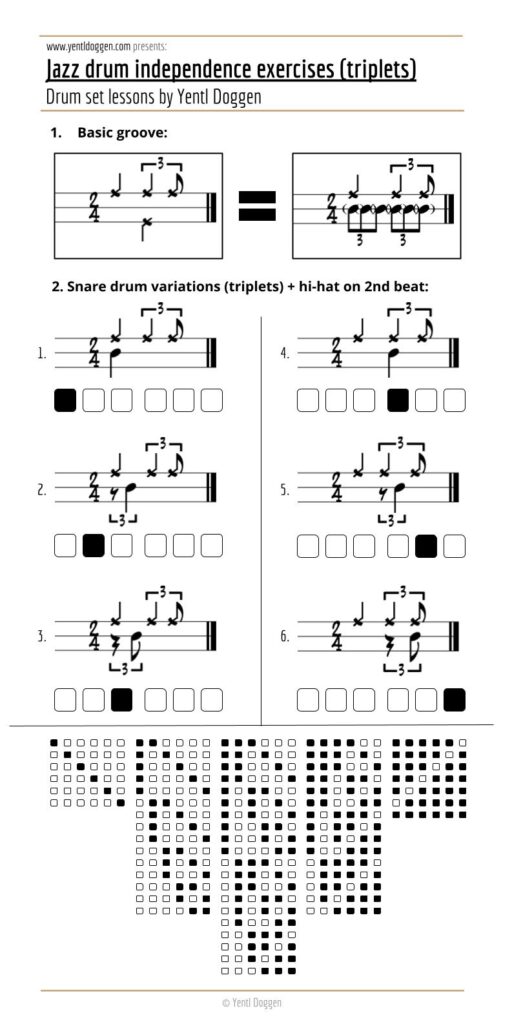
The first drum lesson focuses on the snare drum independence variations in triplets. Exercise one, basic groove, shows the fundamental swing groove we will use in this entire exercise. In the first square, the right-hand plays a standard jazz pattern on the ride cymbal, while the hi-hat, in the left foot, plays on the second beat. The second square represents the notation for the rest of the exercises. The ride cymbal pattern is still there, and while not notated, throughout the following exercises, you should play the hi-hat in the left foot consistently on the second beat. The snare drums are between brackets as a representation of the following practices.
In exercise two, we add the snare drum. The first snare drum comes together with the first ride-cymbal. Afterwards, the snare drum moves to the second and third triplets of the first beat. In the second column, this process repeats itself, only this time the snare drum starts on the second beat, together with the ride cymbal and the hi-hat in the left foot.
Exercise two shows two different notations. The image on top represents the classical drum notation. The image on the bottom of each activity is for the accompanying permutational visualisation. To finish this drum lesson, we must complete the table at the end of the page according to the same principles above. Two black dots stand for two snare drums, and three black dots for three snare drums, etc. The first drum lesson is complete when all variations (64 exercises) between the single and the whole six black dots are played correctly.
If this is your first attempt at playing the drums, these exercises might be tough to play. I would recommend starting with the following post to get more familiar with the drum set; How to play your first groove on the drumset. This drum lesson teaches you the basics of playing the perfect first groove on the drum set, including plenty of independence exercises.
2. Bass drum independence – Jazz drumming.
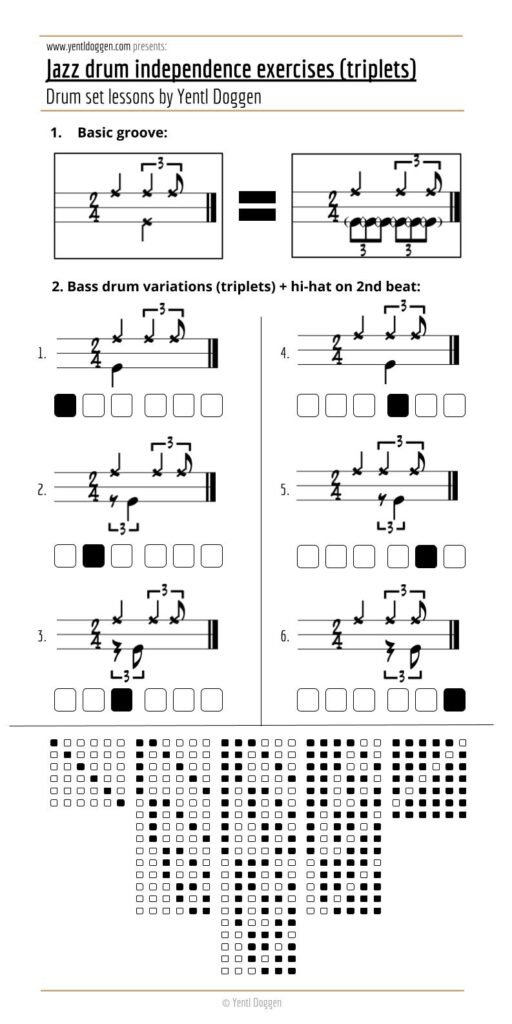
The second drum lesson focuses on the bass drum independence variations in triplets. Exercise one, basic groove, shows the fundamental swing groove we will use in this entire exercise. In the first square, the right-hand plays a standard jazz pattern on the ride cymbal, while the hi-hat, in the left foot, plays on the second beat. The second square represents the notation for the rest of the exercises. The ride cymbal pattern is still there, and while notated, throughout the following exercises, you should play the hi-hat in the left foot consistently on the second beat. The bass drums are between brackets as a representation of the following practises.
In exercise two, we add the bass drum. The first bass drum comes together with the first ride-cymbal. Afterwards, the bass drum moves to the second and third triplets of the first beat. In the second column, this process repeats itself, only this time, the bass drum starts on the second beat, together with the ride cymbal and the hi-hat in the left foot.
Exercise two shows two different notations. The image on top represents the classical drum notation. The image on the bottom of each activity is for the accompanying permutational visualisation. To finish this drum lesson, we must complete the table at the end of the page according to the same principles above. Two black dots stand for two bass drums, and three black dots for three snare drums, etc. The first lesson is complete when all variations (64 exercises) between the single and the whole six black dots are played correctly.
Are you struggling to play all these variations correctly? Instead of focussing on the triplets, starting with the eight notes might be a great idea. Look at the jazz-drum independence exercises for beginners first. From there, this post is only a small step up! 🙂
3. Hi-hat drum independence – Jazz drumming.
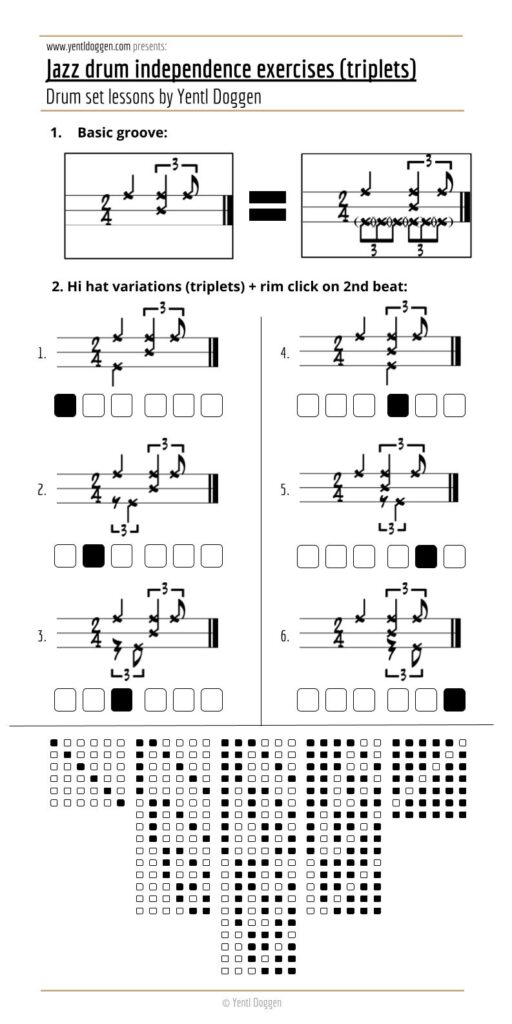
The third drum lesson focuses on the hi-hat independence variations triplets in the left foot. Exercise one, basic groove, shows the fundamental swing groove we will use in this entire exercise. In the first square, the right-hand plays a standard jazz pattern on the ride cymbal while the left-hand plays a snare drum rim-click on the second beat. The second square represents the following practises by placing all possible hi-hats in the left foot combinations between brackets.
In exercise two, we add the hi-hats in the left foot. The first hi-hat comes together with the first ride-cymbal. Afterwards, the hi-hat moves to the second and third triplets of the first beat. In the second column, this process repeats itself, only this time, the hi-hat starts on the second beat, together with the ride cymbal and the snare drum rim click in the left hand.
Exercise two shows two different notations. The image on top represents the classical drum notation. The image on the bottom of each activity is for the accompanying permutational visualisation. To finish this drum lesson, we must complete the table at the end of the page according to the same principles above. Two black dots stand for two hi-hats in the left foot, and three black dots for three hi-hats, etc. The first lesson is complete when all variations (64 exercises) between the single and the whole six black dots are played correctly.
You can download a larger version of the permutations table in the permutations: 4, 5 and 6 posts! It is helpful for this drum lesson and the other lessons in this post. Additionally, I recently published an eBook containing all rhythmic permutations up to the 12-beat variations: Ebook: Rhythmic Permutations, which will expand your rhythmical knowledge further! This will make it possible to play these exercises in a full 4/4 bar, that’s 4,096 combinations instead of 64! 🙂
Are you enjoying following our Music sections? Please let us know in the comments below! If you’d like to learn more about Yentl’s life as a musician, explore the Projects page for current collaborations or visit Online Education for drum lessons and creative inspiration.
To stay up to date with upcoming music posts, performances, and behind‑the‑scenes stories, follow us on Facebook or check this website regularly. We can’t build this platform without our readers, so thank you for your continued support. Stay tuned for plenty more music and stories to come!