How to Practise Drags (with Permarhythms)
Do you feel like you know how to play drags, but still keep ending up with the same few placements over and over? You can play drag taps and drag accents comfortably, but when you try to explore new ways of inserting drags into a pattern, it suddenly starts to feel random.
This post isn’t here to change your current practice routine. Instead, it adds a more structured, visual layer on top of what you already do. Using my Permarhythms system, you’ll learn how to turn any drag-based idea into clearly mapped-out pages. You’ll also see how a single dot grid can generate three completely different drag exercises, simply by changing how you interpret the dots. Think of this as a compact, organised way to systematically explore every possible drag placement in 3-, 4-, 5-, 6- and 7-note groupings without getting lost in dense notation.
The printable PDF version of this post expands the concept into a practical drag workbook. It includes extensive explanations, along with an appendix containing all permutations for 3, 4, 5, and 6, ready to print and integrate into your existing practice routine.
1. What is a drag?
A drag is built from two soft grace notes played in very quick succession before a main stroke. You have:
- Two light grace notes, played with a low stick height and a relaxed touch.
- One louder primary note, played with a higher stick height.
Visually, this looks like a tiny cluster of three notes close together, but in practice it should feel like a single, slightly weighted note with a soft pickup, not like three separate strokes. The goal is clarity and flow, not heaviness.
There are two main directions:
- Right-hand drag:
llR→ two left grace notes, right primary. - Left-hand drag:
rrL→ two right grace notes, left primary.

If all three notes land too evenly, you get something that feels more like a triplet or a crushed group than a proper drag. That is not what we want, because the grace notes should sit in front of the main stroke and lead into it naturally.
Quick Drag Practice Tips
- Use a metronome and start slower than you think.
- Focus on grace-note height, keeping both grace notes low and even.
- Minimise tension in the hand, because loose fingers make drags smoother.
- Film or mirror yourself once to check spacing and avoid overly even spacing.
2. Making your drag practice more systematic:
Drags are one of the core rudiments drummers use all the time. They show up in patterns like drag taps, drag accents, drags in Swiss rudiments, and plenty of orchestral or marching-style figures.
Clean, consistent drags improve your stick control, your timing, and your ability to place soft lead-in notes before an accent or main stroke. They also expand your vocabulary, giving you more ways to add shape and weight to grooves, fills, and solo phrases.
Most drag practice is already simple and effective. Typically, drummers start with basic drag forms, move on to drag accents and drag taps, and later explore more advanced rudimental combinations. That approach works well and there is no need to replace it.
What is often missing, though, is a compact, visual way to track all possible drag placements within 3-, 4-, 5-, 6- and 7-note groupings. That is where Permarhythms comes in. It does not replace traditional practice, but simply adds a clean structural layer on top: a single system that shows you exactly where every possible drag can land, without sending you through pages of scattered notation. Permarhythms lets you track every possible flam‑placement in 3–7‑dot groupings on a few clean pages, so you know you’re not just repeating the same few positions over and over.
3. Permarhythms in a nutshell:
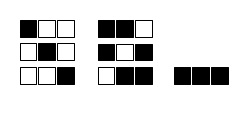
If you have already read about my Rhythmic Permutations eBook, you know the basic idea: white dots represent positions in the rhythmic grid, and black dots show where the rhythm actually falls.
In a 3-dot system, for example, you get:
- Three single-dot combinations: only 1, only 2, only 3.
- Three double-dot combinations: 1-2, 1-3, 2-3.
- One all-dots-filled combination: 1-2-3.
The book methodically walks through all of these combinations in groupings stretching from 3-dot permutations up to 12-dot permutations, so you know you have covered every option within that grouping.
For drags, you reinterpret the mapping in the simplest possible way:
- Black dot = play a drag on that position.
- White dot = play a normal single note.
You do not need to invent new drag moves. You just organise the ones you already understand inside this compact grid system.
4. The three drag-mapping options:
With the same dot grid, you can define three different ways to interpret the black dots. This is where the system becomes really practical.
1. Context-dependent drags:
In this mapping, the drag direction follows the underlying sticking.
For example, if the underlying pattern is R L R L and a black dot falls on position 4, the fourth note becomes a drag on the left hand: rrL.
This is closest to how most drag rudiments are taught: you take a pattern you already know and add drags on certain notes while keeping the rest as single strokes.
In practice, that means:
- For each dot line, you decide which hand falls on each position according to your sticking.
- Then, every black dot becomes a drag with that hand as the primary note.
2. Always right-hand drags:
In this mapping, every black dot becomes a right-hand drag (llR), no matter which hand should play there.
So even if the underlying pattern wants an L there, you still play llR on every black dot. This is useful if you want to:
- Strengthen right-hand drags in a very consistent way.
- Keep one dominant hand charged with the drag role across the page.
Because the same dot line can be re-read as right-fixed drags, you automatically generate a second, consistent drag-practice page from the same visual grid.
3. Always left-hand drags:
In this mapping, every black dot becomes a left-hand drag (rrL), regardless of the underlying sticking.
So no matter where the black dot falls, you play rrL on it. This is great for:
- Balancing your weaker-hand control.
- Making left-hand drags feel as natural as right-hand drags.
Again, the underlying dot grid stays the same; you only change how you interpret the black dots.
5. A few short examples:
To make this concrete, let’s look at two quick examples.
Example 1 – 3-dot grouping:
Take a 3-dot line where position 1 and 2 are blacked:

- Underlying sticking:
R L RorL R Lon repeat.
In context-dependent mode, this becomes:
llR(drag on R) –rrL(drag on L) – R (single), orrrL(drag on L) –llR(drag on R) – L (single).
In right-fixed mode, every black dot becomes llR, so:
llR–llR– R orllR–llR– L.
And in left-fixed mode, every black dot becomes rrL, so:
rrL–rrL– R orrrL–rrL– L.
Play this line slowly at 60–70 BPM, focusing on clean grace-note placement and consistent stick heights.
Example 2 – 4-dot grouping
Take a 4-dot line where position 3 is blacked:

- Underlying sticking:
R L R LorL R L R.
In context-dependent mode:
- R – L –
llR– L or L – R –rrL– R.
In right-fixed mode:
- R – L –
llR– L or L – R –llR– R.
and in left-fixed mode:
- R – L –
rrL– L or L – R –rrL– R.
Again, slow, steady tempo, minimal speed and maximum clarity. The drag-direction change is really the only thing shifting on the page.
If you like this, the printable PDF version of this post includes the same kind of examples for 3-, 4-, 5- and 6-dot groupings, plus an appendix with all permutations in each grouping so you can print them out and practise systematically.
6. How groupings relate to time signatures:
You can apply the same Permarhythms logic across different groupings, and then interpret them in different meters. That is one of the main reasons I love using dot systems for drag practice: one visual grid can fit into multiple rhythmic worlds without changing the underlying rules.
Here is how I tend to think about each grouping in real-playing contexts.
3-dot system:
The 3-dot system is very flexible. You can read the three positions as three eighth-note triplets on one beat of 4/4, which is a natural home for drag-accent-style practice. You can also read them as three eighth-notes in 3/4, giving you a clear 3-beat grid for simple 3/4 drag patterns. If you treat each 3-dot line as a bar of 3/8 and loop it, you naturally move into a 6/8-style practice over two bars.
4-dot system:
The 4-dot system is the closest to what most rudiment books already do. Four positions can be read as four 16th-notes in 2/4 or 4/4, depending on how you loop the line. This is the natural home for classic drag-accent-style practice, where you place drags on the first of the group, or on beats 2 and 4, or in other clearly defined 16th-note positions.
5-dot system:
The 5-dot system is where things start to feel more modern. Five positions can be read as 5/8 or 5/4 phrases, depending on tempo and phrasing. This is useful if you want to explore drag placements in odd-meter contexts, where most standard rudiment pages do not go. You can use this grid for 5/8 fills, 5/4 groove accents, or even linear-style ideas, all with the same Permarhythms logic.
6-dot system:
The 6-dot system is perfect for longer-flowing feels. Six positions can be read as six eighth-notes in 6/8, or as six 16ths in 12/8, depending on tempo. You can also interpret them as six-note groupings stretched over 4/4, which is useful for extended drag patterns or six-note cells that you might already use in fills. In all of these cases, the key idea is simple: you do not need to change the Permarhythms system to use these in different time signatures.
7-dot system:
The 7-dot system is where things start to feel a bit more adventurous. Seven positions can be read as 7/8 or 7/4 phrases, depending on tempo and feel. You can also read them as septuplets in 4/4, which is a handy way to rotate drags across a longer, more polyrhythmic-sounding cell. Unlike 3–6, 7-dot does not line up as neatly with a standard groove universe, but that is exactly what makes it interesting.
7. The printable PDF:
This blog post explains the core idea of how Permarhythms structures drag practice. The printable PDF version expands it into a compact booklet. It includes:
- The explanations of the three drag-mappings.
- Examples for 3-, 4-, 5- and 6-dot groupings.
- An appendix with all permutations in those groupings, clearly mapped so you can follow the same Permarhythms logic.
8. Closing thoughts:
If there is one thing Permarhythms teaches me over and over, it is that structure does not replace creativity — it supports it. You do not need to throw away your favourite drag-exercise pages or method-book PDFs to use this system. You can keep everything you already trust and simply add a compact dot grid that shows you where else drags can go.
If you have enjoyed this approach, explore the Permarhythms section on the site for more dot-based systems and future posts on other rudiments, coordination ideas, and rhythm-permutation experiments. Happy practising, and may your drags become a little more organised with each page you turn.
Are you enjoying following our Music sections? Please let us know in the comments below! If you’d like to learn more about Yentl’s life as a musician, explore the Projects page for current collaborations or visit Online Education for drum lessons and creative inspiration.
To stay up to date with upcoming music posts, performances, and behind‑the‑scenes stories, follow us on Facebook or check this website regularly. We can’t build this platform without our readers, so thank you for your continued support. Stay tuned for plenty more music and stories to come!