
Drum Exercises, Music
Drum independence exercises for beginners (4 drum lessons) | PDF download
Independence on the drum set, or the commonly used term limb independence, describes the coordination ability necessary for multitasking behind the drum kit. Pretty much all drummers use their four limbs whenever they play the drums. This ability allows them to move freely around the drumkit and respond to various factors within the music they are playing. The drum independence exercises for beginners start from a basic or fundamental groove. From there, they focus on one particular limb to train limb independence.
All following drum lessons consist of two different notations. The first notation is the classical drum notation. The second notation represents the accompanying permutational visualisation. Only the first four exercises are written in classical drum notation and give a basic into the 15 different permutational options. I opt for learning these drum independence exercises by the permutations to make you play independently from the classical notation. Moreover, it is easier to visualise all possible combinations through these permutation tables than in the classical notation. This is especially true when the exercises start getting more complex.
How to practise these exercises?
For the best long-term results, I suggest practising with a metronome. I did not give any metronome marks as it doesn’t matter much how slow or fast you play these exercises. It is more critical that every pattern feels comfortable while playing it. I suggest playing every practice at least four times before moving on to the next exercise. Since there is also a video available, it is possible to play along with it.
If you are familiar with the down-and-up method for the hi-hat (what the arrows above the exercise represent), I strongly suggest playing every exercise with these motions. If you are unfamiliar with these motions or want some exercises on the basics of the drumkit, check out my other post: How to play your first groove on the drumset!
1. Bass drum independence exercises (8th note).
The first drum lesson focuses on bass drum independence. Exercise one gives the fundamental groove we will use in this entire exercise. As the bass drum notes are between brackets, this basic groove only consists of a hi-hat in the right hand and the snare drum in the left hand.
In exercise two, we add the bass drum. The first bass drum comes together with the first hi-hat. After that, the bass drum moves to the second, third and fourth hi-hat, going over all the single bass drum options. Exercise two shows two different notations. The image on the left represents the classical drum notation. The image on the right is for the accompanying permutational visualisation. To finish this first drum lesson, we must complete the table at the end of the page according to the same principle above. Two black dots stand for two bass drums, and three black dots for three bass drums.
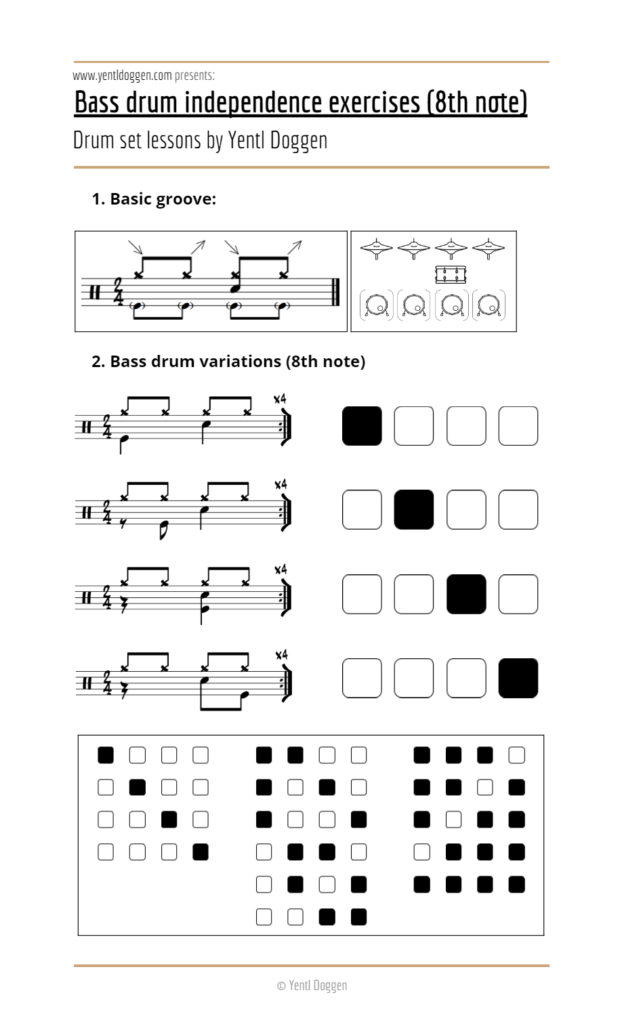
Check out this bass drum exercises post if you are unsure about the permutational system. All bass drum exercises here are written in the classical notation, making them easier to follow.
2. Snare drum independence exercises (8th note).
The second drum lesson focuses on snare drum independence. Exercise one gives the fundamental groove we will use in this entire exercise. This time the snare drum is between brackets. Therefore, this basic groove only consists of a hi-hat in the right hand and the bass drum in the right foot.
In exercise two, we add the snare drum. The first snare drum comes together with the first hi-hat. After that, the snare drum moves to the second, third and fourth hi-hat, going over all the single snare drum options. Exercise two shows two different notations. The image on the left represents the classical drum notation. The image on the right is for the accompanying permutational visualisation. To finish this second drum lesson, we must complete the table at the end of the page according to the same principle above. Two black dots stand for two snare drums, and three black dots for three snare drums.
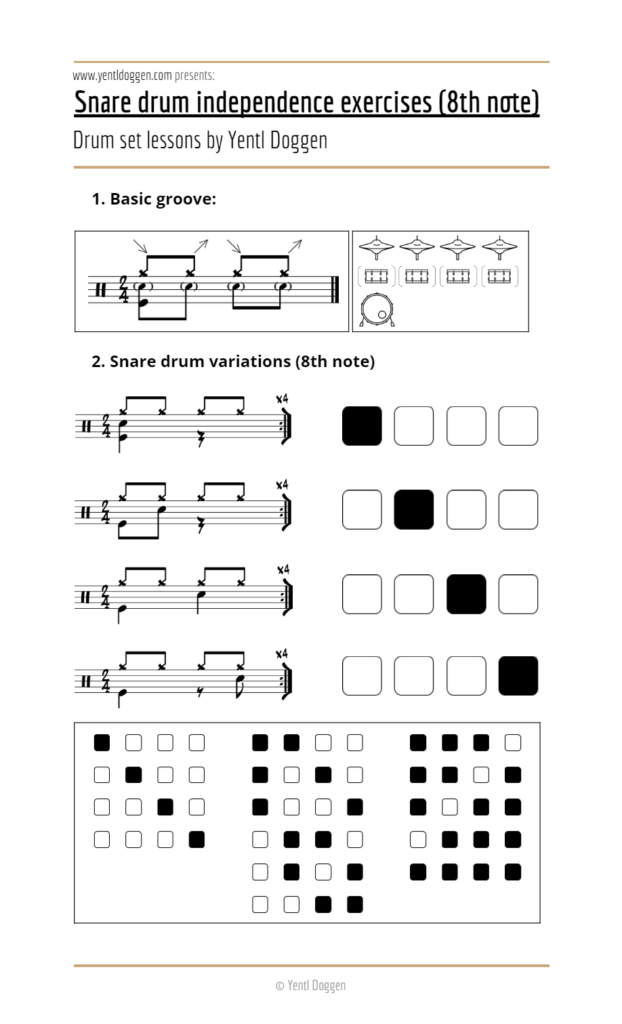
You can download a larger version of the permutations table in the permutations: 4, 5 and 6 posts! It is helpful for this drum lesson and the other three lessons in this post. Additionally, I recently published an eBook containing all rhythmic permutations up to the 12-beat variations: Ebook: Rhythmic Permutations, which will expand your rhythmical knowledge further!
3. Exercises on doubling the hi-hat.
Drum lesson three is the one exception in this drum independence for beginners course. The other three drum lessons focus on permutating from single to double and triple notes. Drum Lesson 3 uses the permutations differently. Exercise one gives the fundamental groove in its purest form. Four hi-hats are played with the right hand, a bass drum (right foot) with the first hi-hat and a snare drum (left hand) on the third.
In exercise two, we add double hi-hats. The first double hi-hat comes together with the bass drum. After that, the double hi-hat moves to the second, third and fourth hi-hat, going over all single and double hi-hat options. The image on the left represents the classical drum notation. The image on the right is for the accompanying permutational visualisation. To finish this third drum lesson, we must complete the table at the end of the page according to the same principle above. Two black dots stand for two times double hi-hats, and three black dots for three double hi-hats.
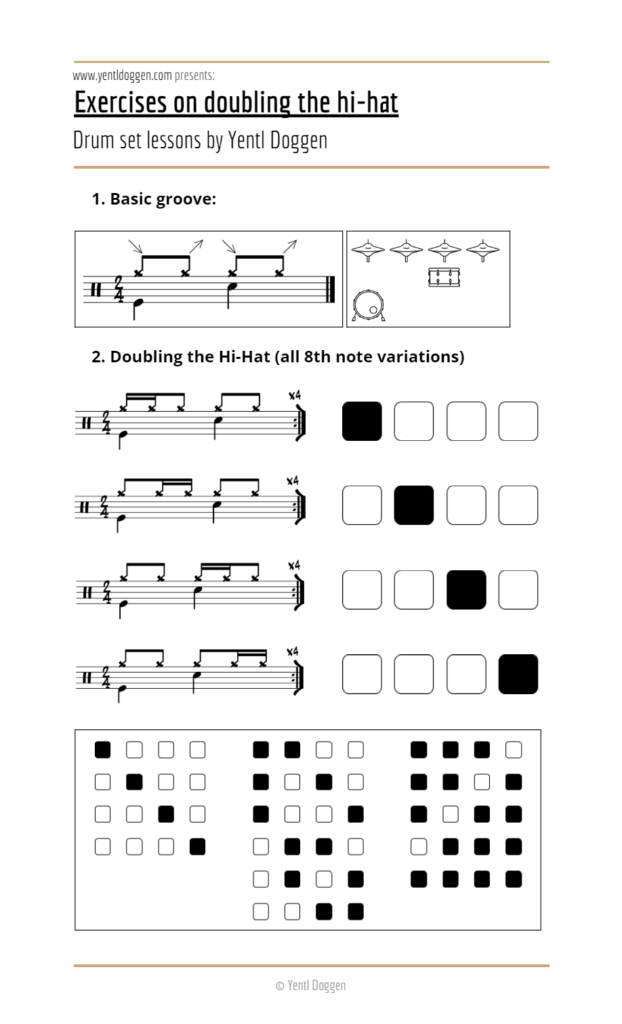
This exercise is the exception in my course, but that doesn’t mean it has to be for you. If you want to stick to permutating the hi-hat, you can always use the permutation table and instead of doubling the hi-hat, play single notes whenever the dots are black.
4. Drum independence exercises for the left foot.
The fourth and last drum lesson focuses on the left foot’s independence. Exercise one gives the essential groove we will use in this exercise. As the hi-hat in the foot is between brackets, this basic groove is played with the ride cymbal in the right hand, the snare in the left hand and the bass drum in the right foot.
In exercise two, we add the hi-hat pedal to the left foot. The first hi-hat comes together with the bass drum and ride cymbal. After that, the hi-hat moves to the second, third and fourth hi-hat, going over all the single left-foot options. The image on the left represents the classical drum notation. The image on the right is for the accompanying permutational visualisation. To finish this second drum lesson, we want to complete the table at the end of the page according to the same principle above.
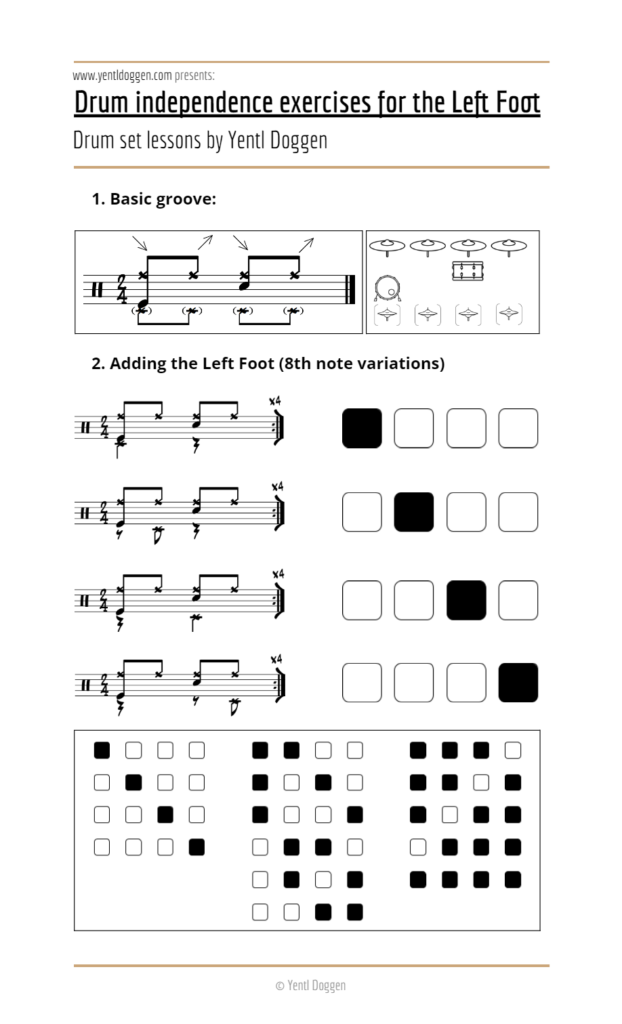
This exercise is pretty hard for beginners and would typically not appear in a beginners course. However, getting that left foot going from the start is crucial. Single notes in the left foot are already a great start if you can’t make it through the whole table.
This drum independence post for beginners is the first drum lessons and exercises post of many to follow. If this lesson was helpful for you, please let me know in the comments below. Suggestions and questions are also welcome, and I’ll try to answer them as soon as possible. Good luck, and I’ll get back to you with more drum lessons and exercises!
Stay in the loop:
My website has multiple ways to keep in the loop with music and travel-related updates. Make sure to follow my Instagram and Facebook pages to get the latest content on your socials. To get the updates in your mailbox, subscribe to the newsletter. I will post plenty of free drum lessons and other music and drum-related advice on this website in the future! Check out the drum transcriptions and analysis if you haven’t already. We can’t build this platform without our readers, so we thank you for your continued support. Stay tuned for many more to come!


Aw, this was an incredibly nice post. Finding the time and actual effort to generate a really good article…
but what can I say… I put things off a lot and never get nearly anything done. 😀
Thanks a lot! Haha, yes, it goes like that sometimes, doesn’t it! 🙂